The no-minimum custom coin builder is an online challenge coin design tool for creating one coin, a small batch, or a larger order without the usual custom coin minimum. You can design your own challenge coin with text, uploaded artwork, photos, colors, plating, and a live front/back preview before adding it to your cart.
This guide walks through the builder controls, explains what each option does, and answers the most common questions about using the coin designer online.
Quick Start
- Open the No Minimum Custom Coins builder.
- Choose whether you are editing the Front or Back of the coin.
- Add Top Arch and Bottom Arch text, or turn the text ring off.
- Upload a logo, photo, or artwork file and position it inside the center design area.
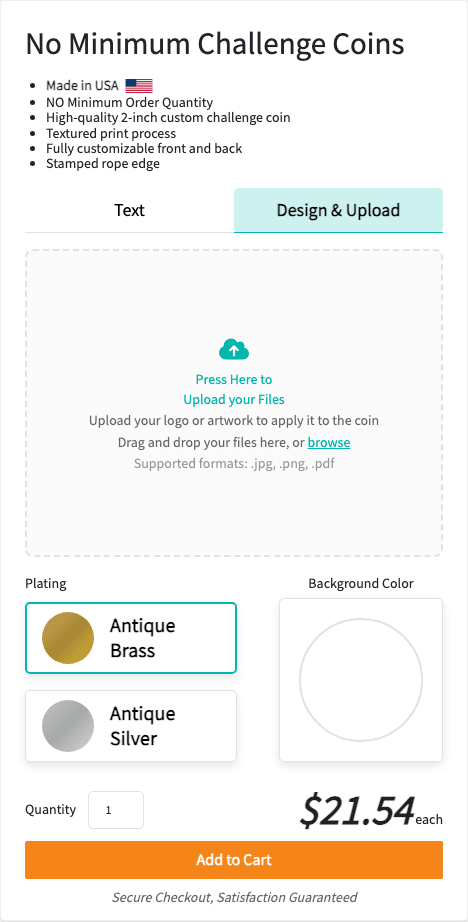
- Pick antique brass or antique silver plating, then choose background and ring colors if you want color behind the text.
- Enter your quantity. The price updates automatically, and larger quantities show lower per-coin pricing.
- Click Add to Cart when both sides look correct.
What “No Minimum” Means
Traditional custom challenge coin orders usually require a larger minimum quantity because they need custom molds. The no-minimum builder uses a streamlined domestic process, so you can order as few as one custom coin while still personalizing both sides.
If you need a fully custom molded coin with custom size, shape, edge, plating, 3D relief, or large-volume pricing, start with the standard challenge coin pricing page. If you want a fast, flexible coin designer online with no minimum order quantity, use the no-minimum builder.
Step-By-Step Walkthrough
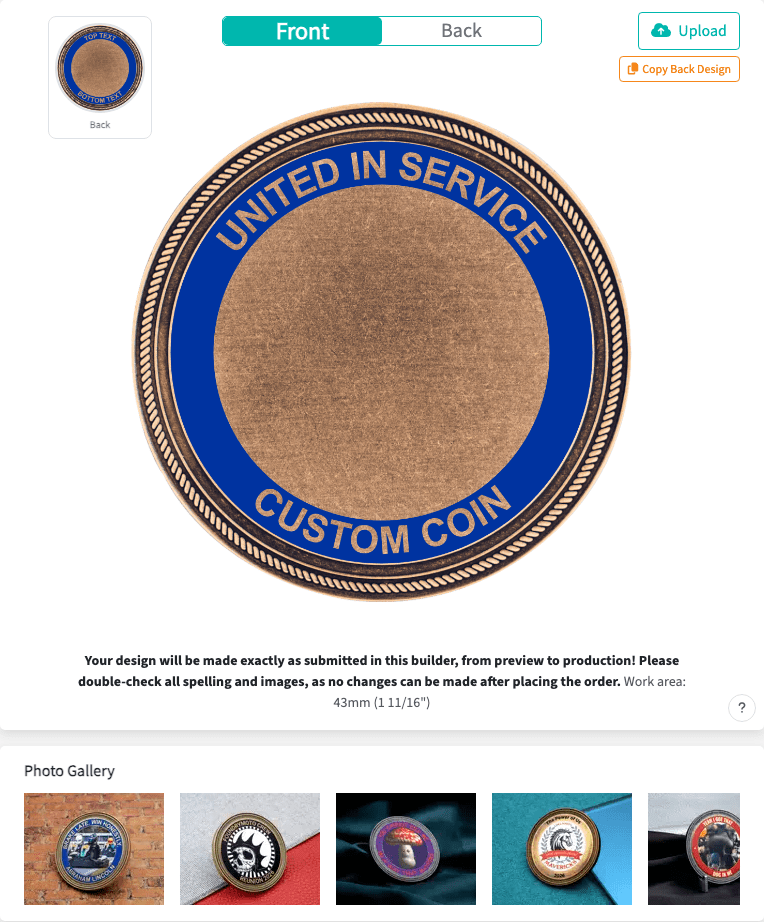
Choose the Side You Want to Edit
Use the Front / Back control near the coin preview to switch sides. Each side stores its own text, uploaded images, background color, ring settings, and layer order.
On the back side, the Copy Front Design button copies the front design to the back as a starting point. When editing the front side, Copy Back Design does the reverse.
The question mark button opens the guided builder tour. Use it if you want a quick walkthrough of the main controls while you are designing.
Add Text to the Coin Ring
The Top Arch input controls the text along the upper ring. The Bottom Arch input controls the text along the lower ring. The preview updates as you type.
Use the small and large A buttons beside each input to decrease or increase that arch’s text size. The number between the buttons is the current size, so you can keep the top and bottom balanced.
The color indicator with the A opens a color picker for that arch. If you choose a color, the text is printed as color. If the Metal / Color button is in metal mode, the text becomes a metal cutout through the ring color.
Change Font Styling
The Font dropdown changes the typeface for the ring text. The size dropdown applies a shared size when you want both arches to match.
The formatting buttons work like familiar text controls:
- B makes the text bold.
- I makes the text italic.
- U adds underline.
- Aa switches all ring text to all caps.
- Metal / Color switches text between a metallic cutout look and colored text.
Some fonts are wider or taller than others. If a long phrase looks crowded, reduce the text size, use all caps only where needed, or shorten the wording.
Use Text Separators
The Text Separator controls add marks between the top and bottom text areas. Choose None, Dot, Star, or Custom.
A custom separator can be letters, symbols, or emoji. If both the top and bottom arches have text, the builder shows separate left and right custom inputs so each side of the ring can have its own separator.
The separator color swatch changes separator color in color mode. The plus and minus buttons adjust separator size when a separator is active.
Turn the Text Ring On, Off, Filled, or Translucent
The Text Ring switch shows or hides the ring text area. Turning it off removes the arch text from the coin preview and lets the uploaded image fill more of the center area.
The No Fill / Fill switch controls whether the ring has a solid color behind the text. With Fill on, the ring color picker changes the ring background. With No Fill, the center artwork can show through and the text is rendered as color instead of metal cutout.
The Translucent option lets some of the coin’s metal texture show through a filled ring color.
Upload Artwork or Photos
Use Upload, Upload Logo or Artwork, or the Design & Upload tab to add files. You can select files or drag and drop them into the upload area on desktop.
Supported upload types include PNG, JPG, SVG, PDF, AI, EPS, and PSD files. Vector formats such as SVG, PDF, AI, and EPS usually give the cleanest edges for logos. High-resolution PNG or JPG files work well for photos.
Uploaded artwork appears in the center design area. Drag the image to move it. Use the transform handles to resize and rotate it.
Manage Uploaded Image Layers
After you upload artwork, the Uploaded files list appears. Open the layer menu to manage an image. Depending on the selected layer, you can:
- Delete the image.
- Remove the image background.
- Center the image.
- Fit it to the design area.
- Reset transform changes.
- Flip horizontally or vertically.
- Rotate left or right.
- Move forward or backward.
- Bring to front or send to back.
- Send the image to the other side of the coin.
- Hide or show the layer.
Layer order matters. Items closer to the front can cover items behind them, so use move forward/backward when a logo or photo is hiding another element.
Choose Plating and Background Color
The Plating cards switch the coin between antique brass and antique silver. Plating changes the metal look of both sides.
The Background Color control adds color behind the center artwork. Use the color picker to choose a background color, or use the trash button to remove the background color.
Reset, Undo, and Redo
Use Reset Coin Design to clear the current design and return the text, colors, separators, and images to the starting layout.
Many builder edits are tracked for undo and redo. Use your browser’s standard Cmd+Z or Ctrl+Z shortcut to undo recent changes, and Cmd+Shift+Z, Ctrl+Shift+Z, or Ctrl+Y to redo where supported. Some image actions, like deleting an image or sending it to the other side, also show an Undo link immediately after the action.
Preview, Quantity, and Cart
The coin preview is the best place to check spacing, text readability, photo placement, and whether the front and back match your intent. The small opposite-side preview helps you keep track of the side you are not editing.
Enter a quantity to update the price. The builder shows price breaks so you can see how much each coin costs at higher quantities. When the design is ready, click Add to Cart.
Image Upload Tips
Use the highest-quality artwork file you have. For logos, vector files are best because they can scale without becoming blurry. For photos, use a large, clear image with the subject centered.
If your image looks cropped, it is probably outside the circular design area. Use Center or Fit to Area, then resize manually if needed.
If your image has a white box or unwanted background, try Remove Background from the image layer menu. This background removal tool can handle most tasks, but may struggle with detailed hair, smoke, shadows, glass, and low-contrast edges.
Keep important text and faces away from the edge of the center design area. The ring and rope edge reduce the usable center space, especially when the text ring is filled.
Pricing and Ordering
No-minimum coins can be ordered in any quantity starting at one coin. The per-coin price changes with quantity, and the builder updates the price before checkout.
After you add the design to your cart, you can review the item, adjust the quantity, and complete checkout. For more traditional molded challenge coin options, compare the no-minimum builder with our custom challenge coin pricing. You can also browse the coin gallery for design ideas.
Production timing depends on the quantity, artwork, and current order volume, but the builder shows your design exactly as it will be submitted for production. Double-check text, images, and both sides before checkout because changes cannot be made after the order is placed.
Troubleshooting
My text looks crowded or hard to read.
Shorten the phrase, lower the text size, reduce the separator size, or switch to a simpler font. Small coins have limited space around the arch, so simple wording works best.
My bottom arch text looks different from the top.
Curved text on the lower arch follows the inside curve of the ring, so tall letters can feel closer together. Reducing the bottom text size or shortening the phrase usually improves readability.
My uploaded image is cropped.
The image is clipped to the circular center area. Use Fit to Area to bring the full image into view, then resize and move it until the important parts are visible.
My image looks blurry.
Upload a higher-resolution file or use a vector file when possible. Screenshots, thumbnails, and small social media images often look soft when printed.
Can I order just one custom coin?
Yes. That is the point of the no-minimum builder. You can order one coin, a small batch, or a larger quantity.
Can I use this as a challenge coin design template?
Yes. The builder acts like a challenge coin design template because it gives you a fixed coin shape, ring text areas, front/back sides, plating choices, and a center artwork zone. Start with the default layout, then replace the text and images with your own design.
Design Best Practices
Keep the most important artwork in the center. Use short, high-contrast text around the ring. Choose one or two strong colors instead of filling every area with competing colors. Preview both sides before checkout, especially if you copied one side to the other.